1. Introduction: Is it really for everyone?
For every 3D artist the word CGI has quite a powerful significance and for most of us it represents the upper echelon in product quality and knowledge.
From its humble definition that literally can represent any image, of various complexity and quality generated with the help of a computer, it has slowly evolved in the eyes of the public into the synonym for cutting edge technology and top tier 3D artists.
This transition became possible due to an increasing use of CGI in games, television and of course blockbuster movies. As the visual quality grows so the complexity of the pipeline and the cost for creating such a product. Developing even a short CGI animation clip can represent a great challenge from a technical standpoint and a pretty time-consuming process.
In this article I don’t intend to go through the process behind movies or CGI animations created by companies whose pipelines include 3D scanning devices, camera tracking, motion capture, render farms and so on. The focus is on presenting my modest approach that hopefully can help you create a “CGI” product, may it be a simple image or an animation.
I used quotation marks for the word CGI because of the fact that many of the methods are “shortcuts” and can be found in different forms in the gaming development pipeline. Nevertheless we will try to achieve CGI quality standards for our small project and at the same time get acquainted to some of the inner workings of the big boy’s pipeline.
So, let’s start and see if we can make CGI production for everyone!
2. Pre-Production: We need to start from somewhere
The pre-production stage is the initial planning and preparation of the project before the actual production. It’s critical to have a clear picture of what you wish to create and of course how you intend to achieve this, before you start working.
This phase can and in many cases has an impressive number of steps, but we can compress them into three core pre-production pillars.
2.1 Idea
As you may have heard already, the most important step is to turn a concept or an idea into something real and tangible, as an idea is nothing in itself if you don’t bring it to life. I truly believe that all people have great ideas but, in most cases, they remain just that, nice dreams.
The first step is always the hardest and to get you on the right track I would like to share a set of rules I try to follow and that work for me as anchors so I don’t lose focus:
Don’t overthink it –usually we tend to search for complex solutions to problems we don’t need to solve or that are not in our scope of work
Limit your working time – its critical when working on any project to set a clear deadline and stick to it even if the quality of the product will not meet your standards but at least you will have a final product
Failure is not an option it’s a certainty- not very inspiring or motivating but the truth is that in all cases you will not be able to achieve your initial target or expectations. Once you understand that your only goal is to grow, each failure will become a lesson learned and an opportunity to find solutions and expand your skills
You are your best critic: constructive feedback- the project is done but this does not mean you toss it in the closet, lock the door and throw the keys away. This is the best moment to analyse and understand what went well and especially what went wrong. Learn from your failures, try to apply your acquired knowledge in the next project and increment until you each time fail a little less.
For this small project, the main focus was to go through the entire pipeline and try to touch as many “issues” that a 3D designer could encounter and hopefully share a number of decent solutions along the way.
The CGI video will have the following elements:
- medieval fantasy sword that should incorporate some organic elements
- camera animation component for presenting the model in an interactive way
- VFX elements that will be introduced in the post-processing
- sound effects necessary to enforce and enrich the mood of the video
We have a pretty clear and simplified scope of work and what we need is to establish a deadline for the project. I estimated that the project will require roughly 150 hours of work from start to finish plus the time to write the article.
One fact I need to point out is that the work you do for your portfolio will be in your personal time and this means that a week of work will represent 8 to 20 hours of actual effort. Don’t get discouraged if you see that the project takes “more” time that estimated. Now that we have everything solved it’s time to get to the next pillar of pre-production:
2.2 Concept
So, what is a concept and why do we need it? If we want to play by the book the definition states that it’s an abstract idea, a plan of intention, something conceived in the mind. It sounds pretty similar to the first pillar we discussed and in many ways it is exactly this but transposed in a more “visible” and tangible way.
It can be a 2D drawing on a piece of paper or in a specialized application. You can just as easy create concepts directly in 3D applications so it’s up to you where you feel more comfortable. But there is more to it than simply selecting the tools that’s why, for an in-depth presentation, I recommend reading an old article of mine that focuses on the entire process behind creating a 3D concept.
Nevertheless, we need some key points to help us move forward, so here they are:
- T - Before you even start drawing the first line think about the universe where your concept exists or comes from. Define, explore and understand it.
- Gather inspirational and reference materials - Inspirational materials will help you better define the overall felling, expressiveness and style of your concept, while the references will help you construct and inform the design. It’s important to understand that even if you create your personal “universe” everything in it must obey a set of rules, that can vary from simple aspects as proportions to complex ones like biomechanics.
- Iteration over finalization - create as many concepts as you can in the time you have at your disposal. Don’t focus on 1-2 designs and start adding details that are not sustained by a clear structure or idea.
Now that we have the concept ready (our 2D concept artist - Andrei Barba was nice enough to provide me with the necessary material) the final step at this stage is to analyse and try to pinpoint all of the actions required in the production stage.
Simply put see what works in 3D, what parts need adjustments and define key components in your model. (fig.1) This will help a lot you with the final pre-production step:
2.3 R&D
Research & development is a critical step of the pre-production stage, if ignored or taken lightly it can and will make your life a living hell. During this period the technical approach is determined and the main focus becomes selecting your software preferences and techniques. In large projects the programmers, 2D/3D artists, animators, VFX specialists and so on, discuss how to bring the concept to life and slowly work on constructing the pipeline for the project.
I will present our small CGI animation pipeline and go through each component and why I have chosen a specific software for the job. A more detailed description will be presented once we reach each step of the production and post production process. (fig.2)
A. 2D/3D Concept
Hopefully we have a good understanding of this component but what about the software we can use? For 2D concepts, from what my team has experienced, I saw that most rough sketches and free flow drawings are done with a simple pencil on a piece of paper. After than you can use applications like Photoshop to clean them up, add colour and iterate much faster.
B. Polygonal Modelling
Many of you use different modelling applications that use this approach as their backbone for creating 3D content. I personally use 3Ds MAX, but you can use any similar application since the principles and good practices are included in all of them. For hard surface modelling I find this approach faster, cleaner and more responsive to changes than 3D sculpting.
As you can see from the pipeline, the process spreads from pre-production to production. This is a direct response to all of the tweaks, adjustments and refinements we planned on the 2D concept. It’s critical to understand that a concept is done only when the product is done. Until then modifications will take place and trial and error in many cases will occur until you get the perfect balance between the concept and an actual viable product.
C. 3D Sculpting
As much as I like working in 3Ds MAX, mostly because I prefer hard surface modelling, I can’t ignore the potential and freedom that a 3D sculpting application offers you especially for organic modelling. When I saw the 2D concept, the first thing that popped in my mind was the opportunity to sculpt a stylized lion head.
Even if you only do polygonal modelling, I strongly encourage you to play around with a sculpting program and you will see new opportunities arise and your overall quality of the models will grow exponentially.
ZBrush is my main sculpting application and for this project I mainly used it to sculpt the lion’s head and add high frequency details to the other components of the sword. As with the case of the polygonal modelling the process is situated both in pre-production and production for the same reasons as specified above.
D. Texturing
Once the modelling part is done the next step is texturing. I will go in more detail on the process further in the presentation, but for now the important aspect is the fact that I opted for a PBR (physically-based rendering) approach. As artists, we are interested in the light ray model as it describes the interaction of light and matter.
Once we understand these principles it becomes easy for us to create textures that simulate real-life materials and even play around with their physical properties to get different visual results.
For this I used Substance Painter, an application used in the gaming industry with a nice set of functionalities ranging from texture backing, painting, and exporting to a wide range of game and render engines.
E. Animation
This part of the pipeline is quite simple since the entire animation is done only on a 3D camera and all other assets are static. The key part is to think of how you can make your life easier in the post-processing stage where you need to combine a 2D animation with 2D and 3D post processing components. As you can presume the animations have been created in 3Ds MAX but tweaks and corrections were done even in the post-processing stage.
F. Rendering
Here we are at a critical part of production and the most expensive and time-consuming component in the CGI process. For most of us this is a brick wall, especially when we hear that for a 1-minute animation the render can take hundreds or thousands of hours on a single computer. If we take in account the high price, and the complexity of rendering engines like Vray, Iray, or Octane we can see many obstacles appear in our pipeline.
So, what can we do about this? The short answer is to find alternatives that are less expensive and that don’t require such a massive computing power to generate an image or a video, of course at a lower but acceptable visual quality. The magic word is real-time rendering; software applications, for either simple 3D visualization tools or full game engines, that create high quality animations or images in “almost” real-time (30 frames per second will suffice in most cases).
For our little project I chose Marmoset Toolbag 3 (3D portfolio presentation software) but the same or even better results can be achieved with a game engine like Unity 3D or Unreal. Be prepared nevertheless to render the same sequence for multiple times just for minor tweaks and fixes. This is where the power of real-time renders really shows, giving you the ability to iterate fast and test different approaches in an acceptable time frame.
3. Time to get our hands dirty
After all the planning and research, it’s time to start the actual work. This part of the article will focus more on problem solving and best practices than the actual gritty work. Even if I use specific softwares, most of the difficulties and solutions we encounter should be easily translatable to your personal set of tools.
3.1 Modelling
From a technical perspective, the fantasy sword was not a very complex model to create. Nevertheless, a set of rules and best practices helped me avoid any problems along the pipeline, because as you know, the modelling was just a small step in the entire process.
To create a structure for this phase I will break the process in two components:
- Basic mesh poly modelling - most of the modelling involved hard surface elements, so this was the perfect approach for creating the sword’s components quickly
- High details and model sculpting - the beauty of working with Zbrush is the incredible level of detail you can add to a model without worrying about topology, flow and of course poly count.
Poly modelling:
- use the concept as blueprint - if you have a 2D concept even from a single view (in our case front facing), use it. Don’t try to eye ball the image if you have the opportunity to insert it in the 3D modelling software.
- break the model in logical components - don’t try to modelling the entire object using only one mesh. Identify your components and separate them.
- use modifier stacks - a key feature of 3Ds MAX are the stacks, a set of modifiers that can be applied to an object which contains the accumulated history of the changes done to that specific mesh. It’s a great way to work in a non-destructive and experiment manner, without the fear of losing your current work and the extra work of repairing any mistakes you made
- create good UVW maps - most 3D designers dislike this step in the modelling process, but nevertheless we need to check some key points to achieve a good texturing:
- unwrap with the smallest amount of seam cuts
- be careful of distortions and use a checker texture to identify problematic areas
- you should have the same pixel density for the entire 3D model. If that’s not the case some textures will appear blurry in comparison to others
- prepare the model for the sculpting stage - before we export the model in ZBrush, we need to add swift loops to preserve the shape once we subdivided it. At the same time the model needs to have a uniform distribution of polygons. A good distribution will give us enough density for the entire model to add the details we want without the need to subdivide over and over again.
I added figure 3.0 so you can see the elements of the sword and the blade modelling steps that are similar to the other components to give you an overall view of the process.
Sculpting and high frequency details:
In a time where the difference between a nice model and a great one is made by the subtle things, a sculpting software can really give you an edge by adding that extra detail to your work. Like I previously mentioned, I use ZBrush, but you can try other applications like Mudbox, 3D-Coat, MODO that have the same core functionality. Still I would like to give some tips to those who are new to 3D sculpting or don’t use it as an integrated part of their design pipeline:
- use a tablet - don’t try to sculpt using a mouse, just don’t. Even the cheapest graphic tablet will do the job. At the same time don’t buy the most expensive tablet if you are a beginner, it will not have any impact on the quality of your work.
- create your brushes and alphas library - You will see that a great deal of high frequency details like skin wrinkles, scratches and so on are made with alphas and custom brushes. Work smart, don’t reinvent the wheel and focus on adding your originality and don’t waste time on repetitive or mechanical labour
- free flow sculpting - if you are new to sculpting, this is the perfect way to start learning. I see many people that want to learn ZBrush and pick overcomplicated models and of course they fail and stop learning. Just start modelling using a sphere and see where it goes and learn from each new playthrough.
- study organic modelling - sculpting software is a great tool but to avoid frustration when trying to model, please research and understand what you want to model. Get references, anatomy plates, anything that can help you avoid making a “shape without a form”.
- don’t go overboard with details - a mistake all of us do is to add detail over detail on our models. It’s so easy to get lost in the mirage of adding more and more detail but keep in mind that our eyes need a place to rest and when a model is oversaturated it loses its identity and even its structure.
- break symmetry - symmetry is your friend but when at the later stages of modelling, especially when adding details (like the stylized lion’s mane) disable it to give a more natural look to it.
- don’t abuse the divide function - another common mistake is to subdivide the model until it reaches ridiculous numbers (tens of millions of polygons) just to get that scratch detail perfect with a camera at 1 cm distance from the model. Think about the level of detail you are targeting, the minimum distance of the camera and the resolutions at which you will render the image or animation before dividing the geometry.
Last but not least don’t forget that you need to export that heavy geometry and use it in the baking and texturing process and it will slow down your process if you are working with those numbers of polygons for just one component of the model.
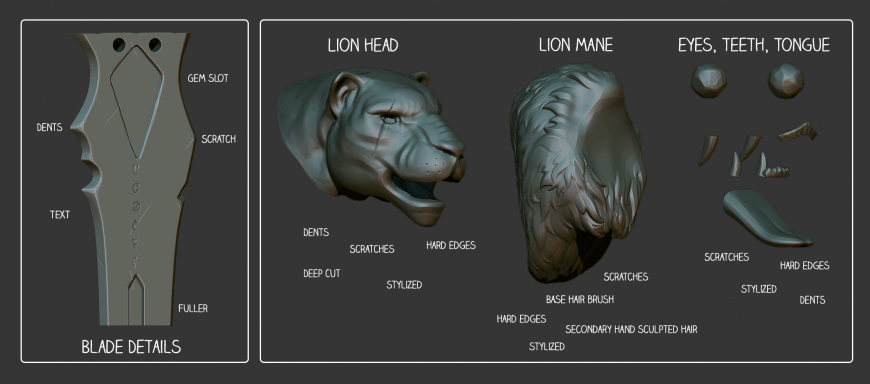
Figure 4.0 presents the details added to the upper part of the blade and the components that make up the lion’s head to give you a feeling of the level of detail and the art direction I was going for.
3.2 Texturing
For the texturing I used substance painter, a nice program that I recommend for everyone that wants to create textures for games (wide range of game engines pre-sets are available for texture export) and even for small CGI projects with really nice results.
The texturing process has the fallowing steps:
- baking input maps - from the high poly model (in our case the ZBrush sword) we extract a set of textures (normal map, curvature, ambient occlusion and so on) to the low poly models. These textures will help us create the output textures for the CGI assets.
- PBR texturing - the actual texturing process in substance painter is pretty beginner friendly and once you understand the principles of smart materials, smart masks, layers and filters we can have great results in no time.
Right from the start, I saw a challenge in the form of the topaz stone material. Since my render engine was not a ray traced one, simulations such as dispersion, refraction, Fresnel reflections could not be achieved at the desired quality level or at all in some cases. Given the circumstances, I understood that I needed to get a “simulation” for the material from the texturing and not from the actual rendering engine.
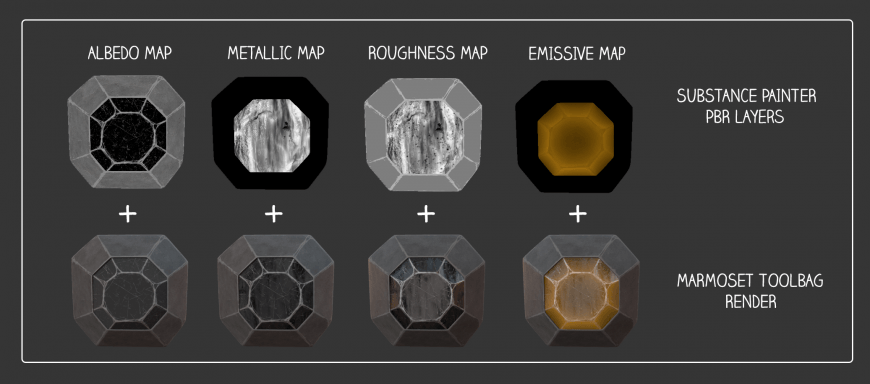
I experimented with the diffuse, metal and roughness textures layers to get the feel I wanted for the topaz. For simulating the light passing though the topaz I used an emissive layer, as a small hack. Further refinements would be done in the rendering and the post-production stage. You can see in figure 5.0 the texture layers and their effect on the topaz stone.
The rest of the sword was mostly composed of different metal variants. Nevertheless, I encourage you to create your own smart materials and play around with their physical proprieties via the following channels:
- Albedo - this channel represents the pure colour information of the material and its pretty self-explanatory
- Metallic - a fully white colour represents a pure metal that reflects a big amount of light and a black colour represent a non-metal that absorbs most of the light and has an albedo colour.
- Roughness - for this channel a fully white colour represents a smoother surface with brighter, focused and stronger reflections, while the black value has larger but dimmer highlights
For the lion head you can see in figure 6.0 the structure of the smart material I created and the values for each of the 3 components to understand why these channels are important and how modifying them can create the visual feel you want and add extra detail and a more natural feel to your texturing.
3.3 Animation
A vast and complex topic that branches from motion capture, mechanical rigging, skinning, character rigging and so on can be a challenge for anyone to understand and learn. At the same time, I encourage all graphic designers to have at least a basic knowledge in this field because it will add great value to your presentations with a minimum effort form your part.
In our small example we made a simple camera animation setup that should be straightforward to implement for anyone with a basic experience in any 3D modelling software, still some tips and good practices can help you along the pipeline and make your life a little easier in post-production:
- animation flow - when creating camera animations try to avoid breaking the flow by stopping the actual movement or rotation abruptly. At the same time when doing cuts try to end a part while the animation is still going and go to the next one that is already in motion.
- use more than one camera and animation curves - don’t be afraid to use as many cameras as you need to experiment with different angles, animations and you can even try using the same setups or scenes, just filmed from different perspectives. One thing that sometimes goes unnoticed is that the animation curve can be modified to create a more organic feel to the camera movement. A linear animation without any acceleration, deceleration will feel very rigid.
- animate more than you intend to use - you will not know from the start the best cut-off timing, what cameras give a better look, so create as much material as you can for the post-production part, especially compositing.
- helper objects - a great solution for a problem further along the pipeline, respectively how we can add different VFX elements in the right places (in 3D space) when our output is a sequence of 2D images. The answer is that we export the 3D camera animation and the XYZ position of the helper objects in After Effects to they can be used as placeholders for the special effects component.
Figure 7.0 depicts the animation curve of the camera and the helper objects placed at key points that will require heavy VFX work in post-production.
3.4 Rendering
For the rendering I used Marmoset Toolbag 3. It is a small but powerful real-time rendering suite capable of delivering good image quality and, with a modular shader approach and flexible scene editor, it’s a great platform for presenting your portfolios.
After I imported the animation file and configured the materials with the generated textures, I worked on finalizing the animation scene. This process had the following steps:
- use an appropriate HDRI skybox - PBR workflow gives us a solid base to create high quality scenes and simulate complex materials in detail, but without having an environment that reflects and scatters light all around you, the final image will have an artificial and neutral studio look. If this is not your intention a good HDRI map can add a natural feel to your scene and contribute to the overall visual theme
- add lights - a HDRI image is a great way to light the scene but in most cases, you need at least a directional light for good shadows and depending of your requirements other light types can be used.
- camera depth of field - The best tool for any 3D designer who wants to showcase or hide parts of their product in an elegant and subtle way. It is widely used across all forms of visual products (stills or videos) and you should try it and see for yourself.
- setup render options - this is the final step before the actual rendering and, in most cases, it involves cracking up all the visual options for the render engine to get the best quality possible. From local reflections, ambient occlusion, high resolution shadows, global lighting all contribute to a better quality and an exponential rendering time. Before you go “full HD”, render low quality test animations to pinpoint problems and solve them before you go all in.
- export animation sequence - this part is self-explanatory, but my recommendation is to always export image sequence and not videos. In case of a critical failure you can easily resume from where you left of, you can tweak different blocks of animation and render only that sequence again so it’s a very flexible and forgiving approach.
Figure 8.0 presents the same model but with different HDRI skyboxes taken in the render engine.
4. Post-Production: Are we there yet?
We arrived at the final step in our production pipeline. It was a long road from a concept to an actual video but the work is not over yet. This last piece of the puzzle, if done right, can elevate the value of your product. In the following steps I will present the changes I made to the raw animations to achieve this goal.
4.1 Compositing
The process of combining visual elements from multiple sources with the purpose of creating the visual illusion of a single scene is basically what compositing is all about. The actual complexity of the process comes from the elements you want to integrate in your scene especially when we are discussing about an animated scene where models or VFX can enter and exit the camera field of view.
In the case of our project I had the following plates added to construct the final scene:
- 2D sword + background animation sequence – this is our core animation in the form of image sequences
- VFX tiger glowing eyes - I added this effect to the tiger’s eyes as a jumpstart for the “powering up” of the fantasy sword (helper object was used to place the glowing effect in 3D space)
- VFX core crystal - this effect had 2 stages, the first one was the emissive effect on the stone followed by the electric arc along god rays (helper object was used to position it in 3D space)
- VFX tiger eyes lightning strike - the lighting strike effect was made with an AE effects generator called advanced lighting that I tweaked to get the desired results.
- VFX sword lighting arcs - I used the same effect generator for the arcs but this time I added an extra effect for the floor impact and the god rays that break the air around the lighting strike
- outro thunderstorm sky - this composition was made of a smoke video and a set of animated sprites for the smaller clouds along a modified lighting strike composition
- outro 3D text - the 3D text was generated in After Effects with the help of element3D plugin. I added point lights that where synchronized with the lighting strikes so as to highlight different parts of the text
In figure 9.0 we can see a part of the plates that make the final composition. I recommend the site
http://www.videocopilot.net/tutorials/ where you can learn everything related to AE and VFX.
4.2 Special Effects
The special effects for this small CGI were done exclusively in Adobe After Effects. When learning to create any kind of special effects, you should take into account these tips:
- 2D and 3D workspace - even if in most cases you work with 2D assets (an image or a sequence), in AE any element can be converted to 3D and this can help you achieve the desired result. I encourage you to play around with this setting and understand how it works especially when adding cameras and light sources to the scene.
- AE effects & presets - an impressive effects and presets library is at your disposal so make sure the you know what each one does and more importantly how they work together in a stack
- Precompose - as you create more complex effects, the number of layers will grow, so a way to stay organized is to compose them and even create nesting if required (a composition in a composition)
- Input data from other software applications – don’t forget to use materials taken from other applications for your special effects. From sprite animations, to complex simulated particle systems, 3D objects, videos, almost anything can be used the create completely new effects
- Render complex simulations - in many case when working on complex special effects that require high processing power and ram usage, your workstation will start to drop in performance and even freeze. A great solution after you are satisfied with the results of your VFX is to render it as a sequence of images and use it as a plate in other compositions.
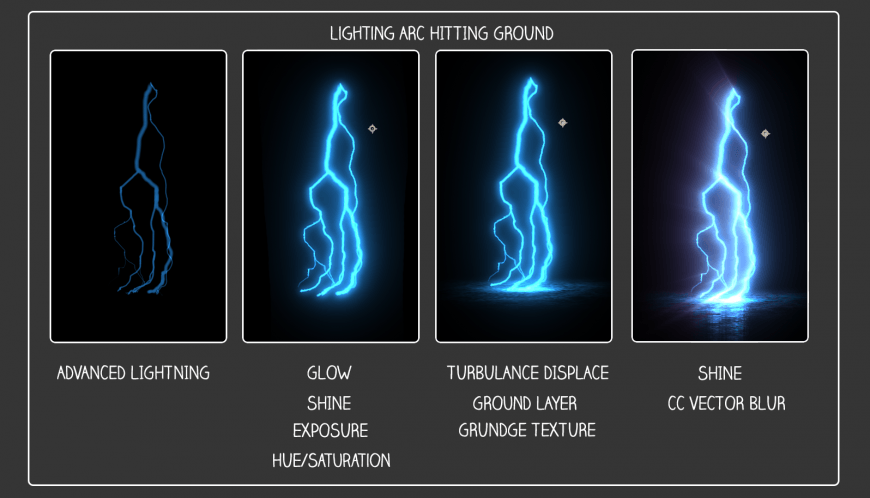
The most time consuming of VFX for the CGI has been the lighting strike effects. A great help was that the core effect already existed as a preset in AE and I had to create the animation and use some expression for a more chaotic look. After this initial step a lot of effects stacks have been added to create the desired final effect and compose it into the final shot. In the figure 10.0 you can see the evolution of the effect from start to finish.
4.3 Colour Correction
Colour correction seams a pretty simple think to do. A little contrast here, some saturation there, a vignette effect and we are done. For our little project this is true as you can see in figure 11, but don’t underestimate the visual impact of this step. It can dramatically change the mood of the image and enforce the theme of your project with the help of the final step in our post-production and that is of course the sound effects.
4.4. Sounds
Does our CGI require sound effects, or a background music track? The short answer is a solid YES. Our brain is very susceptible to sounds and even if from a memory stand of point a visual or tactile input is the most clearly remembered, a sound can have a strong emotional impact and this is where its main purpose lies.
In our CGI animation the sound effects are used to empower the actions that occur on the screen and at the same time enforce the overall feel of the video. A total number of 11 sound effects have been used and composed in Premiere Pro to create the final sound track for the video. Some tips I learned from making the soundtrack:
- every action needs at least a sound - try to avoid having something happening on the screen and no sound accompanying it
- play with audio effects - you can create new sounds by playing with the effects presets. Experimentation is the key for creating interesting and unique sound effects
- mix sounds - don’t be afraid to cut, blend or overlay sounds on top of each other to create new sound effects
- create a hierarchy - think what sounds need to have a higher volume, what sounds should decrease in volume or stop when others enter the scene. In simple words try to have a soundtrack were no sound feels misplaced.
5. Final Thoughts: What's next?
Our small CGI animations is done, of course we failed a little but learned a lot and this is the most important thing to remember. I hope this small introduction article made all of you a little more confident in trying to develop your personal CGI pipeline and create great things along the way.
Don’t be afraid to fail, learn with every opportunity and on this note I am eager to hear all of your thoughts and experiences in this vast and exciting field.
→ If you want to find out more about the author of the article click play on the below video.